Archive for October 2014
What In The World Is Kawaii????
Tag :
cute,
hello kitty,
japanese cute,
kawaii,
kawaii food,
lolita fashion,
pikachu,
pokemon,
sweet lolita
What In The World Is Kawaii????
For the longest time I have seen so many cute Japanese type illustrations and I never knew what the style was called. Well, I finally was able to click on a really cute picture of fruit and found out it's in the style
"Kawaii". Kawaii (かわいい?, [kaw͍aiꜜi], "lovable", "cute", or "adorable"[1]) is the quality of cuteness in the context of Japanese culture.[2][3][4] It has become a prominent aspect of Japanese popular culture, entertainment, clothing, food, toys, personal appearance, behavior, and mannerisms.[5]
The word "kawaii" originally derives from the phrase 顔映し, which literally means a "radiant face", but more commonly referred to the blushing of an embarrassed person. (http://en.wikipedia.org/wiki/Kawaii)
In my earlier posts, you know I really like to study other cultures. Its a weird fascination of mine. Anyway, being a graphic designer on the side I decided to take a spin on my own kawaii images. So far I have a sketch and as soon as I get it transferred into Illustrator and looking all pretty I will post it on here!!!
 |
| starting sketch of my kawaii design |
 |
| finished design!!! by Asia Sansalone |
I think it is the cutest thing ever and often gives me sort of a warm glowy feeling inside!
Kawaii style doesn't just stop with illustrations of food, but other kinds of things like fashion and make up, and just an overall type of life style.
Kawaii fashion is called "Lolita" and "Sweet Lolita" this fashion is based upon the Victorian Era and a mixture of porcelain doll looks. This often entails dresses with a lot of bows and ribbons and lace. Even some men decide to partake in this fashion and some even go as far as dressing as kawaii women.

Kawaii products are ever present in the harmonious driven Japanese culture. I had a grand opportunity to visit Japan when I was a little girl and I remember a lot of kawaii products. I didn't know the name of it then, but I wanted everything. Even stationary looked invitingly cute!!!
The most common place the western culture can recognize this style is in some Japanese based cartoons. Pokemon is a huge one with Pikachu being a huge kawaii mascot. Another huge kawaii type character that is easliy recognized is Hello Kitty! She's everywhere in Walmarts! Little girls absolutely adore her, but now wonder she's an adorable kitty!!

The Kawaii culture has definitely grown in Japan and I think that is majorly due to globalization. Who doesn't love adorable stuff, I like the idea of almost featureless faces... I never drew noses on my smiley faces ever since I can remember... anyway... it's really a big part of the Japanese culture and is starting to satisfy a global quench of cuteness!

I would love to see any of the Kawaii things you all like or have drawn!! Please share
Wednesday's Blood Moon Lunar Eclipse and How To Photograph It
UPDATE!!!!! I had a lot of fun photographing the eclipse! It was challenging but really awesome to look at! I ended up using my telephoto lens and here is probably my favorite shot out of about 100 photos. NO EDITING OR PHOTOSHOP! RAW IMAGE!
 |
| Photo by Asia Sansalone |

Tonight, well early morning October 8th there will be an astronomical phenomenon known as a lunar Eclipse as well as a blood moon. The full eclipse will start at 6:25 a.m. EDT and last until 7:24 a.m, according to NASA.
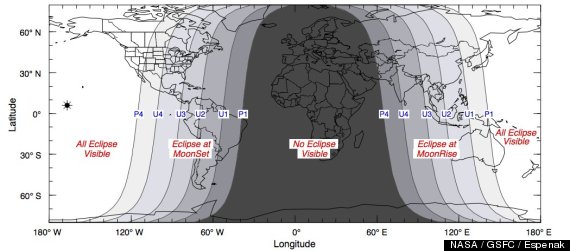
What is a lunar eclipse? It is an eclipse in which the moon appears darkened as it passes into the earth's shadow.
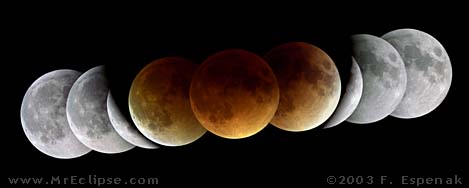
Why is it a" blood moon"? The moon will appear a coppery red, so it's been called a "blood" moon. It'll look red because of all the sunsets and sunrises from the Earth that will reflect onto the lunar surface.
This is a perfect opportunity for all photographers to get some really awesome photos of the moon. I'm planning on doing a multiple exposure photo. That means I will take multiple shots of the progression through the lunar eclipse. Afterward, in Photoshop I will compile the images into one photograph. This will show the movement of the lunar eclipse.
How to photograph the lunar eclipse using the Multiple exposure technique.

The multiple exposure technique gives you a special frame of movement capturing the total lunar eclipse compiled into one photo. With digital cameras, a series of exposures are shot during the eclipse and saved as separate image files. These are later stacked and combined into one image using a photo editing program like Photoshop.
This involves finding your exposure. Doing some test shots before the eclipse starts is a good idea.
Use a tripod and manual focus on a lens of your choice. A wide angle lens is best for a multiple exposure shoot but you can use a telephoto lens to get a large picture of the moon. An essential key to the success of this method is ensuring that your camera and tripod remain absolutely rigid and do not move throughout the eclipse.
Your ISO will probably be within the 400-1600 range on the smallest aperture available depending on your lens you are using.
The shutter speed will be anywhere around 8 seconds to 15 seconds. You don't really want any longer than that or you will get a star trail effect.
Correction: I was shooting the moon at about 1/400 of a second and then as the eclipse was happening I slowed my shutter speed to about an 8th of a second. 15 seconds was way too long and gave me an over exposed moon.
Make the first exposure as the partial eclipse begins and then shoot additional exposures every five to ten minutes. Be consistent and use the same time interval between every shot. This will produce an aesthetically pleasing string of evenly spaced Moon images showing the progress of the eclipse. (http://www.mreclipse.com/LEphoto/LEphoto.html)
Since the exposure changes through out the eclipse process you will need to adjust along with the shots.
After taking your pictures of the eclipse stack them in photoshop and play around with the stacking effects until you get the desired look.
I will update this post with pictures I'm taking tomorrow morning!
Please share your lunar pictures too!!!
After taking your pictures of the eclipse stack them in photoshop and play around with the stacking effects until you get the desired look.
I will update this post with pictures I'm taking tomorrow morning!
Please share your lunar pictures too!!!
15 Products That Will Keep You Tolkien
I love Tolkien, he is probably my all time favorite author. That being said I have a slight obsession over anything Lord Of The Rings, Hobbit, Elven/Dwarven, anything Tolkien. I spend a lot of time on Pinterest. I mean a lot of time, it's my go to vegitating spot when I'm not working on some crazy paper or playing my favorite video games. Anyways with out further a do.... here are 15 Tolkien inspired products for that awesome nerd in you.
1. A One Ring Inspired Mug
One mug to rule them all, one mug to find them, one mug to bring them all and in the darkness bind them. You could totally DIY with all of those sharpie mug tutorials.

2. Lord of The Rings Monopoly
Whoa! I'll take Mordor for $200 please. A perfect spin on a classic game.

3. That's What I'm Tolkien About T-Shirt
Sport this nerdy gear and you'll be the talk of your club. Even wear it to the next Hobbit release in December!!!

Popular from the fellowship of the ring the "Speak friend and enter," quote on the doors of the Mines of Moria.

5. The Eye of Sauron Desk Lamp
This eye will never let you down in the dark for he is the manifest of darkness itself.

6. Hobbit Yahtzee
Another classic game turned into pure awesome.

May all of your dreams be filled with Tolkien glory (it's a fairly decent price too!!!)

8. The Music of The Lord of The Rings
This is truly a must have for all of those LOTR fans. Howard Shore's music is absolutely fantastic and this is a must have.

"What about elevensies? Luncheon? Afternoon tea? Dinner? Supper? He knows about them, doesn't he?"
There's even a tutorial to show you how to make your own!!!

10. The One Ring Black Speech Fire Pit
How awesome it glows like the ring does when a fire is lit!!

11. Run Like Ring Wraiths Are After You
If a group of undead kings doesn't motivate your inner Hobbit to run faster, I don't know what will.

12. Hobbit Slippers
Keep your feet warm with Hobbit feet!! Extra hair for extra warmth!

13. Tree of Gondor T-Shirt
Sport the Gondor crest and connect with your favorite fictional world and characters

14. Ring Wraith Hooded Coat
Ever wanted to be an undead king? Here is your chance to chase after some Hobbits to answer the call of the One Ring

15. Smaug Funko Pop! Character
Who wouldn't love this adorable little Smaug. I am Fire, I am Death, I am Cute!!

There you have it! 15 awesome Tolkien products to please your Middle Earth needs!!
Do you have any Tolkien products that have just wow you out of your adventuring shoes? Please Share!!
DIY Legend of Zelda Lamp

Last semester, or two semesters ago, honestly I can't remember, I had received an assignment in one of my classes to use recycled materials into something new. I chose glass and actually was in a Legend of Zelda obsession at the time. I decided I was going to turn a big glass pickle jar into an awesome Zelda lamp! It actually got voted the most creative and made it in the top three recycled creations. You can use these materials to do any kind of design too.
Things you will need:
1. Jar
You can choose any jar. I just chose a large one
2. Glass Paint

You can pick this up at Hobby Lobby for about 3 bucks. Click the link for the actual product
3. Liquid Glass Leading

4. Design
I searched around for all kinds of designs to use, but in the end I made my own based on the Hyrulian shield Link uses. I found my color scheme and drew my design up on paper.
5. Paint Brushes
Any paint brushes will do. Even the cheap ones. I found the smaller ones were a lot easier to use for better detail
6. Strand of Christmas Lights
I used plain white lights that I had laying around the house. They give the fairy in the bottle effect which is really well known in the Zelda world.
7. Time
The more time you take to think of your design the better it will turn out. The paint also looks really good with a few coats.
What to do:
-First you want to make sure that the jar is really clean, go to the recycling center/flea markets/garage sales you can find all kinds of jars.
-Draw up your design. You can make it as simple or as complex as you want. I found that drawing the design with sharpie on the reverse side of the design on transfer paper/parchment paper made it easier to trace on the actual bottle with the liquid leading.
-Trace your design with the liquid leading. The liquid leading gives the bottle that stained glass effect. The separation of pieces. A lot of people thought that I had actually broken the bottle and pieced it back together. (I definitely found a much easier and faster process with the liquid leading)
- Paint in the design. The paint is a little weird at first when starting out. It comes on kind of pastel looking but will dry to a clear stained glass look. The more coats of paint the darker the hue of the paint will be

-Take your time! The more time you take the better your design and composition of the whole piece will be. It also takes time to dry!
- Make sure your Christmas lights work and then place them inside the jar. It gave mine the fairy in the bottle look that is ever so popular in the Zelda world. Then plug it in and watch the wonders of Zelda come alive!
-There you have it! One awesome geeky lamp for all your geeky needs. I found that it makes more of a really cool decorative lamp than anything!!


Hey Zelda Fanatics Share your awesome DIY Zelda crafts!!!


