Showing posts with label photography. Show all posts
Wednesday's Blood Moon Lunar Eclipse and How To Photograph It
UPDATE!!!!! I had a lot of fun photographing the eclipse! It was challenging but really awesome to look at! I ended up using my telephoto lens and here is probably my favorite shot out of about 100 photos. NO EDITING OR PHOTOSHOP! RAW IMAGE!
 |
| Photo by Asia Sansalone |

Tonight, well early morning October 8th there will be an astronomical phenomenon known as a lunar Eclipse as well as a blood moon. The full eclipse will start at 6:25 a.m. EDT and last until 7:24 a.m, according to NASA.
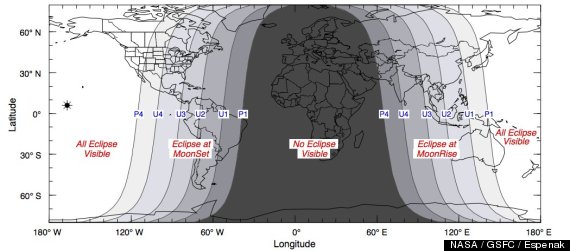
What is a lunar eclipse? It is an eclipse in which the moon appears darkened as it passes into the earth's shadow.
Why is it a" blood moon"? The moon will appear a coppery red, so it's been called a "blood" moon. It'll look red because of all the sunsets and sunrises from the Earth that will reflect onto the lunar surface.
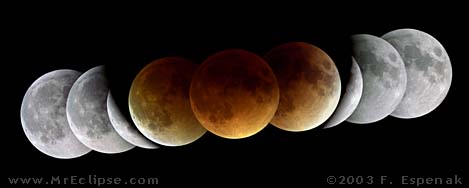
This is a perfect opportunity for all photographers to get some really awesome photos of the moon. I'm planning on doing a multiple exposure photo. That means I will take multiple shots of the progression through the lunar eclipse. Afterward, in Photoshop I will compile the images into one photograph. This will show the movement of the lunar eclipse.
How to photograph the lunar eclipse using the Multiple exposure technique.

The multiple exposure technique gives you a special frame of movement capturing the total lunar eclipse compiled into one photo. With digital cameras, a series of exposures are shot during the eclipse and saved as separate image files. These are later stacked and combined into one image using a photo editing program like Photoshop.
This involves finding your exposure. Doing some test shots before the eclipse starts is a good idea.
Use a tripod and manual focus on a lens of your choice. A wide angle lens is best for a multiple exposure shoot but you can use a telephoto lens to get a large picture of the moon. An essential key to the success of this method is ensuring that your camera and tripod remain absolutely rigid and do not move throughout the eclipse.
Your ISO will probably be within the 400-1600 range on the smallest aperture available depending on your lens you are using.
The shutter speed will be anywhere around 8 seconds to 15 seconds. You don't really want any longer than that or you will get a star trail effect.
Correction: I was shooting the moon at about 1/400 of a second and then as the eclipse was happening I slowed my shutter speed to about an 8th of a second. 15 seconds was way too long and gave me an over exposed moon.
Make the first exposure as the partial eclipse begins and then shoot additional exposures every five to ten minutes. Be consistent and use the same time interval between every shot. This will produce an aesthetically pleasing string of evenly spaced Moon images showing the progress of the eclipse. (http://www.mreclipse.com/LEphoto/LEphoto.html)
Since the exposure changes through out the eclipse process you will need to adjust along with the shots.
After taking your pictures of the eclipse stack them in photoshop and play around with the stacking effects until you get the desired look.
I will update this post with pictures I'm taking tomorrow morning!
Please share your lunar pictures too!!!
After taking your pictures of the eclipse stack them in photoshop and play around with the stacking effects until you get the desired look.
I will update this post with pictures I'm taking tomorrow morning!
Please share your lunar pictures too!!!
Star Trails Tutorial
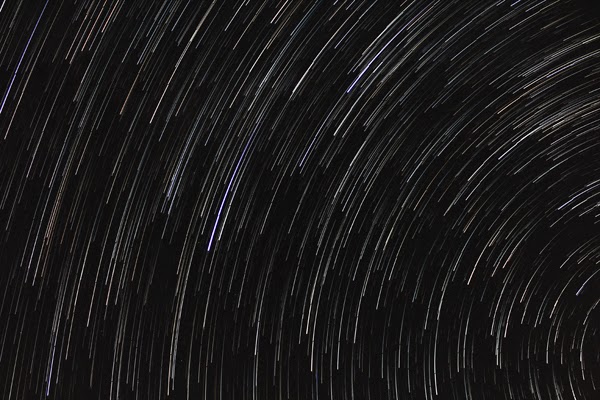
I had mentioned in my about me section that I am a communications graduate but emphasized in photojournalism. I love taking photographs of the night sky. Star trails are beautiful and an easier way to start an amateur photographer into astrophotography. What are star trails? They are a compilation of photographs (a lot of photographs) put together in an photo editing software to show the movement of Earth relative to the stars.
 |
| Photograph by Asia Sansalone |
Things you need for your star trails:
1. DSLR Camera
2. Wide Angle lens/lens that will get you a large portion of sky
3. Tripod
4. Remote timer
5. Very Dark Sky
6. Photo Editing Software
7. Clear Weather
8. Time
Tutorial For Awesome Star Trail Photos:
1. Get your camera set up. Set up your camera on a sturdy tripod in a very dark place outside pointed into a composed picture ( you can add trees/rocks/houses in the fore ground to give it some depth)
2. Focus your shot. For this you must turn your camera to manual focus. Point you camera at a very bright star and focus your lens until the star becomes sharp and clear. Try hard not to bump you lens from this point on. (This can be kind of hard especially if the moon is in the sky)
3. Find your exposure. When it comes to photographing the stars, exposure time is probably the most important. Usually it falls with in the 15sec-30sec range depending if the moon is out or you are in a more light polluted area (next to a city). Exposure is determined by your shutter speed and ISO settings. My ISO is usually around 1600 when I am shooting star trails.
4. Connect your remote timer. The remote timer allows you to be able to hook up your camera and chill out for a few hours while your camera is doing all of the work. Set your timer for as many pictures is can take possible at an interval of 0 seconds and the exposure time for about 30 secs ( I say about because where you are located and if there is a moon in the sky can change the exposure length any where from 15 secs to 30 seconds)
5. Leave your camera. After you have your shot set up and remote timer ready to go, you can leave your camera where it is for a few hours. Watch a favorite movie, read a book, or have a picnic outside. The longer you have the camera out shooting the more star trails there will be. The shot above took about 4 hours and consisted of compiling about 346 pictures.
6. Pick your photo editing software. I have two ways of compiling my star trail pictures. One way is I use photoshop (it takes a little longer) and the other is free star trail software called StarStax. StarStax is rather self explanatory but photoshop has a number of ways you can achieve the stair trail photograph.
7. Photoshop Startrails (made easy)
You can also do this in Photoshop by going to File -> Script -> Load Files Into Stack and then click OK. Wait for all the images to load, and then select all the layers and change the blending mode to Lighten. Try experimenting with different blending modes to get the desired effect.
There is also a photoshop action you can use to do the same thing but I feel like you don't have as much control but you can download that here
 |
| Photo by Asia Sansalone |
You can play around with exposure and shutter speed to change how your star trails will look. I would love to help you all if you have any questions. PS. you can also point your camera at the north star to get circular star trail patterns!
Please ask questions if you need anything clarified! I would love to see some of your examples of star trails!


